Thursday, December 27, 2012

Cinnamon Roll Puffs

I was craving something light and sweet this afternoon, and thankfully today I'm working from home...so I decided to take a little break and rummage through the fridge. Unfortunately, my fridge is pretty much full of dairy products, leftovers and vegetables (no lie, 2 gallons of milk, sour cream, yogurt, eggs, a drawer full of vegetables, and leftover lasagna... I think it's time to go grocery shopping).

But lo and behold, I found a can of biscuits hiding in my door, and it hadn't expired yet, so my brain got to turning...and I came up with these delicacies. While they may not be the exact definition of healthy, you have to give in to your cravings every once in a while, right?!


Cinnamon Roll Puffs


Ingredients:

1 can of biscuits (I used the regular small can with 10 biscuits)
Sugar
Cinnamon
3tbsp butter, melted.


Directions:

1. Preheat the oven to 450degrees F.
2. Using your fingers or a rolling pin, flatten each of the biscuits out into a small circle.
3. In the middle of the biscuit, brush melted butter onto biscuits. Then sprinkle sugar and cinnamon in the middle.
4. Fold the biscuit edges up and pinch in the middle to make a little puff, then flip it over to see only the smooth side. 
5. Place on a greased pan, and sprinkle cinnamon and sugar on top. Bake for 6-8 minutes, or until top is golden brown.


These were so good, and the dough reminded me of pretzels..next time, i'm going to just sprinkle some kosher salt on top and forego the sweets!


Cauliflower and Chicken Mac n Cheese Casserole

I posted about a healthy twist to Mac n Cheese the other day, but last night, we decided to change it up a bit, and I must say, it was delicious!! I'm guessing Gus thought so too, there was hardly any leftovers, and it went right along with his Paleo Diet.

This recipe is the perfect size for 2-4 people, depending on how hungry you are, and if you have anything else on the side!

*Just a helpful tip, make sure you have everything ready to go, this recipe moves quick!*


Cauliflower and Chicken Mac'n'Cheese Casserole

Ingredients:
  • 1 head of cauliflower
  • 2 chicken breasts, chopped into bite size pieces
  • 1/2 an onion, chopped
  • 2tbsp. minced garlic
  • cayenne pepper
  • salt
  • pepper
  • basil
  • 2tbsp. butter
  • 3tbsp. flour
  • 2c. Milk
  • 2c. Cheese
  • 2 egg yolks
  • extra cheese to sprinkle on top

Directions:
1. Start a pot of salted water on high to bring to a boil.

2. While waiting for water to boil, sauté onion and garlic with butter in pan till fragrant, then add chicken, cayenne pepper, salt, pepper, and basil
 

3. Brown chicken on all sides, then remove pan from heat


4.Preheat oven to 350degrees F.

5.Once water boils, add cauliflower, and boil for four minutes, or AT least before it starts to get mushy (I did about 3minutes) Drain, but reserve 1/2c of liquid for the sauce.

6. Set the pot back on the stove, and turn burner up to medium heat. Melt butter slowly, then add flour and whisk for about 4 minutes. *You're making a roux, and you want to cook as long as possible, to get rid of the flour taste*

7. Add milk and 1/2c of cauliflower liquid, and stir constantly until sauce begins to thicken, about 8-10 minutes. Whisk in the egg yolks and cheese until cheese melts, then take off the burner.


8. In a casserole dish, layer your cauliflower and chicken on the bottom, and then pour cheese sauce over the top. Here, you can sprinkle some bread crumbs on top if you'd like, or do like we did, and sprinkle some more cheese..you can never have too much cheese, right?! ;)


9. Bake casserole for about 20 minutes, then serve it up!!


Wednesday, December 26, 2012

Yoga with a Belly...

As this pregnancy continues (31 weeks now!), I find myself getting larger...and larger...and, weighing in after my two Christmas dinners, I'm up to 24 pounds, holy moly. So I decided an hour of intense prenatal yoga would do the body some good.

Now yoga is very safe, but just like anything during these 9 months, consult a doctor to see if it's okay for you. Yoga can do wonders for your body, it can help:


  • Relieve Edema (fluid retention) and cramping
  • Reduce nausea, morning sickness, and those mood swings we hear about..
  • Relieve tension around the cervix and birth canal
  • Focus on opening the pelvis to make labor easier and quicker


I ventured out to world wide web today, haha, to try out some new yoga videos, besides my dvds that Gus got me. I have to say, most of them were EXTREMELY cheesy, very old school with the music that makes me want to laugh instead of breathing in and out deeply. But then, I tried checking out Hulu. I have a Hulu subscription because I refuse to pay 120/month for the few shows that I do watch...besides, Gossip Girl is done for forever, and The Walking Dead isn't even back on for another couple of months!

If you have cable, try out Hulu Plus. I put it on my Roku, and my Playstation3, and they have all kinds of yoga classes on there! Here's a link to the ones I did today, Yoga Zone and Gaiam Yoga. Now, it's no live class, where you can feel the positive energy in the air, but just make your own. And with the calm of this thunderstorm outside the windows, Oliver and I had a peaceful mind and body stretching this morning that hopefully helped lose some of the calories I ingested yesterday :/

Next, I'm going to try some meditiation...but for now, Happy Stretching!

Sunday, December 23, 2012

Marsala Pork Chops

So we've been in Alabama the past couple of days, visiting my father, taking our LAST trip baby free!! It was an 8 hour drive, and I just can't imagine what that would be like with a newborn in the back..I think i'd love it, and hate it all at once.

But just because we're traveling, doesn't mean we can't eat healthy! Well, semi-healthy. Gus has been craving Chicken Marsala, and my father's favorite food is Pork chops, so we combined the two, and used Gus's memory. It was delicious, and fresh tasting...soo good. I'm going to go ahead and apologize for the photos, we've been on the road, my camera was dead, so I was using my sister's Iphone..and that's all I have to say about that, ha!


Marsala Pork Chops
Ingredients:

4 pork chops
1c Flour
.5c Milk
2tsp salt
2tsp pepper
2tsp paprika
2 Shallots
2tbsp minced garlic
1c mushrooms
2c Marsala Wine
Unsalted Butter
Fresh chopped parsley, for decoration (and to add a fresh taste to your food)

Directions:

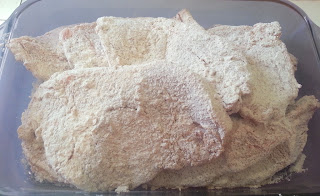
1. Heat oven to 350degrees F. In a bowl, combine your flour, salt, pepper, and paprika and mix well. Dip pork chops into milk, then straight into flour mixture, and set aside.


2.  Slice mushrooms into thin pieces, as well as shallots.

3. Slice butter into 1/2tbsp pieces, and heat up in pan on the stove. Pan should be hot, we're going to pan sear the pork chops. **You might want to turn on a fan, it could get a little smokey!** Pan sear each piece of floured pork, adding more butter as necessary, so as not to let pork stick to bottom of pan. Set aside all pork into a baking dish.

4. Heat 2 more tablespoons of butter in pan, and saute garlic and shallots until fragrant, then add in mushrooms, and cook for two minutes, stirring constantly. Add marsala wine, and let the mixture simmer for about five minutes. 

5. Pour wine sauce mixture over pork chops, and then bake in oven for 10-15 minutes, depending on the thickness of your pork chops. Pork should be 165degrees Fahrenheit, don't let it overcook! Pork can get dry pretty fast.

6. Take out of the oven and serve immediately, with fresh parsley on top :)


Everyone loved this recipe, even my 9 year old little brother. You can't go wrong with a mixture of smothered pork chops, chicken marsala, and having a fresh, healthy dinner!

Thursday, December 20, 2012

My favorite Snickerdoodle recipe...ever!

So yesterday, I had a doctor's appointment for Oliver, a standard check up. Usually, I like to reward myself for making it through another weigh in, and hearing the doctor's slightly condescending tone when she says, "Oh, you've gained another pound....". So last night, I decided to make snickerdoodles on a whim!

Now, I used to have a recipe memorized, but because of my prego brain, all I could remember was flour, sugar, butter...a good start, but not enough to make an amazing cookie. So I googled, and googled some more, and found three different recipes that had great reviews...then combined them, and tweaked them a little, and ended up with this crazy delicious, soft and chewy Snickerdoodle: (Excuse the picture, I had a split second to take an iphone snapshot while running out the door to work this morning)


Snickerdoodles
Makes about 24 Cookies
Ingredients:

1 stick butter (1/2c)
3/4C Sugar
1tsp. vanilla
1 Egg
1 1/3C flour
1tsp lemon juice
1/2tsp baking soda
pinch of salt
Sugar and Cinnamon (to roll the cookies)


Directions:

1. Preheat the oven to 400degrees F.
2. Cream the butter and sugar till light and fluffy. Add in the vanilla, lemon juice, and the egg, and mix until fully combined.
3. In a separate bowl, sift the dry ingredients together. Slowly add the dry ingredients to the wet ingredients. Cookie dough will be moist, DO NOT add more flour, it'll be okay ;)
4. Have a separate bowl with sugar and cinnamon ready, and roll small pieces (or big pieces, whatever size you'd like) into balls, and roll into cinnamon sugar concoction. Place cookies on well greased/parchment lined pan at least 1 inch apart. Press down lightly on cookies with fingers or a flat cup to flatten the cookies slightly.
5. Bake for about 7-8 minutes, till edges start to get hard, then remove from oven. Cookies will continue to cook on pan, then after five minutes, remove onto a cookie rack.

These cookies turned out so chewy and delicious, I couldn't help myself and had two with a cup of hot cocoa. Enjoy!

Wednesday, December 19, 2012

Eating Healthy While Pregnant

It's been a while since I've been on here, and it's because I'm very silly...and forgetful now! Of course, it's no excuse, butttttt.... I am expecting a little boy! Meet Oliver :) 


That was him at 18 weeks. I am now 30 weeks, and gaining ounces by the second it feels. I sadly let go of my healthy living lifestyle for a bit, but I'm back to it for a couple of reasons: A. I missed blogging and learning more about myself and new delicious things for me to eat. B. I've hit the 20 pound weight gain mark, and am not feeling too excited about that. 

They tell you that you can't eat all kinds of delicious things when you're pregnant...yep, no more Brie and crackers, or pigs in a blanket [like how I went from keeping it classy, to kicking it old school? ;)]. I've also been told multiple times, "You're eating for 2 now!".

So while I feel hungry enough to eat for 20, I know that it's time to get back to eating clean. My fiance is living a paleo lifestyle, so it's not too hard to keep it healthy in our fridge. Besides my  prenatal yoga and walks, I've cut back on my carbs, and have found a few delicious recipes on the way.

My favorite so far is a spin on a classic...Mac'n'Cheese. I know, i know, "cutting back on carbs my butt" you might be thinking, but check this out:


Mac and Cheese Style Cauliflower


cauliflower, healthy macaroni and cheese


Ingredients

8C. Cauliflower Florets
2Tbsp. Butter
3Tbsp. Flour
2C. Milk
1tsp. garlic powder
2C. grated cheddar cheese
Cayenne pepper
2 egg yolks
Salt & Pepper

Instructions: 

1. Preheat the oven to 375degrees F. Bring a large pot of water to a boil and add cauliflower.
2. Boil cauliflower for about 4 minutes (I get mine to the point of almost tender, so as not to be mushy for the end result). Drain, but reserve 1/2 cup of the cauliflower water. Set cauliflower to the side.
3. In that same hot pan, melt the butter over medium heat, then whisk in the flour and cook for about 2 minutes, as to get rid of the flour taste. Whisk in the milk and cauliflower water, and cook for about 7-10 minutes, whisking every now and then, until sauce thickens.
4. Remove the sauce from the heat, and stir in the cheese, cayenne pepper, garlic powder, and egg yolks until the cheese is melted.
5. Layer cauliflower in a baking pan, and pour cheese sauce on top, spreading evenly. Bake for 20 minutes. Serve with some grilled chicken or a thick juicy steak (Well done of course, if you're prego!)
Enhanced by Zemanta

Sunday, July 15, 2012

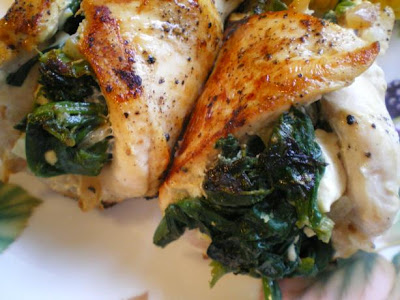
Spinach Artichoke and Cream Cheese Stuffed Chicken

Every time I go to make an elaborate dinner (and by elaborate, I mean, not grilled chicken and veggies, or something plain and similar), I always look to pinterest. But this time, I couldn't find anything that I wanted to make! So I came up with my own recipe...which I then found later, a little different than how I made it, but very similar. 


It really was pretty simple, and EVERYONE loved it. Please try it out, and let me know if you have any thoughts to changing it up a little bit.


Ingredients:

5 Boneless Chicken Breasts
1 8oz package of light cream cheese (Neufchatel)
1 cup of fresh spinach leaves
1 6oz jar of Artichoke Hearts
Fresh minced garlic
Panko Bread Crumbs
Toothpicks

Directions:

1. Preheat oven to 375 F.
2. Pound out grilled chicken till flat and spread thin, then set aside
3. Heat cream cheese in microwave for 45 seconds, allowing it to warm and become soft and easy to mix.
4. Chop artichoke hearts, then add artichokes and garlic to cream cheese and mix well.
5. Here you can switch it up. My chicken wasn't very large, so I chopped my spinach in to thirds and mixed it in with the cream cheese. Or you can just layer it in the chicken before adding cream cheese, to leave the leaves whole.
6. Place a scoop of spinach and cream cheese mixture at the top of the thinned out chicken, and then roll up, stuffing the cream cheese in the middle in case it starts to spill out of the sides (DON'T BE AFRAID TO GET YOUR HANDS A LITTLE MESSY...JUST MAKE SURE THEY'RE WASHED!)
7. After chicken is rolled up, place a toothpick through it to keep the chicken together and rolled up.
8. Roll chicken in the panko bread crumbs. It should stick to the sides lightly because of the wet chicken, without the need for an egg base. If you're chicken has dried and the panko is not sticking to the chicken as well, dip into a beaten egg mixture before dipping in panko.
8. Bake chicken on oiled pan in oven for about 35 minutes, then serve.


This is an extremely light and flavorful meal...you might want to double it, your family WILL want more!


Thursday, July 5, 2012

4th of July...Get Drunk, Not Fat.

I'm not sure what it is about America...but give us any holiday (4th of July, MLK Day, Christmas...oh wait, it's a Chinese New Year?! Sure, add that in too), and we will drink to it. We love to celebrate any cause. Unfortunately, when you're dieting, those holidays can waste away those past couple of weeks of weight loss you've spent all your time and energy on.


I just found this new website, and am in love. It's called Get Drunk, not Fat. So thanks to these people, I am able to give you ways to...well...get drunk and not fat, this 4th of July.


1. Rum and Diet (Or CokeZero). A normal drink is about 2 oz of liquor to about 1 cup of mixer. Really, however much you'd like. 1 glass= 115 calories.


2. Sour Apple Martini. Mix 2.5oz of sour mix, 3/4oz of three olive vodka, 3/4oz sour apple liqueur (not midori!), shake until cold and serve up. Only 160 calories!
3. Champagne. A 4oz glass of that yummy bubbly is 85 calories. 


4. Michelob Ultra. If you're a beer drinker, you know that it's almost impossible to find a low calorie good tasting beer. But if you want a lighter beer, go for a Mich Ultra at 95 calories.


5. Yuengling Premium Light. I'm proud to say, we've got our own Yuengling brewery right here in great ol' Tampa Bay. A nice yuengling light will only set you back 99 calories. I'll have to give this one a try!


So happy drinking to you! Of course, everything in moderation, and don't drink and drive :)

Check out this website:


Tuesday, July 3, 2012

Back to Blogging...and Down Weight!

Things have been crazy in my life since the end of the last semester. It's definitely been a journey this past month, and I have some excellent news to share soon!
But throughout my insane schedule (which of course mostly involved school and social life, and the occasional DIY nights), I've managed to keep up with my weight loss. I'm happy to say, that I've lost a total of 19 pounds...the right way! 
And it's all thanks to exercising at least three times a week with some light weight training, and eating under 1200 calories a day. Which might seem extremely hard, but it wasn't too bad at all.


My biggest tip for keeping under 1200 calories a day, was to snack a LOT. I know...sounds weird right? But whenever I was hungry, I would constantly keep something around to munch on till I got full. Here's some excellent yummy snack foods to try out:


1. Tomatoes: You can cut up an entire tomato and snack on it with some light salt and pepper...i think it's so good! And only 22 calories for one medium sized tomato!


2. Cantaloupe: This has been my FAVORITE snack. It cures that sweet tooth, and fills you up so fast! The great thing is...one cup of cubed cantaloupe is only 54 calories.


3. Pretzel Sticks: I buy the Rold Gold Pretzel sticks, and I'll munch on those during snack time. This helps out the salty cravings, and 53 pretzels is only 100 calories.


4. Pistachios: These were a once in a while snack, mostly because about 45 nuts has 160 calories, and it doesn't make you full fast...but they taste oh so yummy. It's also a great source of fiber.


My thing is, when I have these snacks, I set aside portions to bring to work with me, not the entire bag and then just eat from that. That's where I always go wrong, and by the time I've noticed, I've eaten almost an entire bag of pistachios or half the bag of pretzels. Combine this snacking with carbs eaten earlier in the day and good sources of protein and fruits and veggies, and you'll see the pounds come off easily :)


Thursday, May 17, 2012

The Easiest Way to Lose Weight.

I've been given the task of losing as much weight as possible. My job has just started a Biggest Loser Competition (Jackpot so far of $350, and growing)! Thankfully I work for a small company, and I am in the lead right now...competition is definitely a huge push for me, I HATE losing. And it's easy for me, because I've figured out what to do..


But when it comes to dieting, most people put it off for days...weeks...even months...or just give up altogether. Because we think that dieting means, expensive foods, feeling hungry all the time, and having to give up our favorite snacks. But it's not that difficult! The secret is to just keep track of what you eat. I've done this, and have lost 9 pounds so far, beating everyone's weight loss of 0-3 pounds! And the best way i've been able to do it is with this program:


This program/app lets you say how much weight you want to lose a week (up to two pounds) and then finds out what you're daily routine is, how many calories you lose just from that routine, and how much you'd have to work out and eat to acheive your goal. The best parts about it for me are:

1. You can add your friends, so it's like you're losing weight with them...big motivator! And no one else has to see what you weigh, it just shows how many pounds you've lost. My log-in is Jloche89 in case anyone wants a friend to help motivate.
2. It's an App on your phone, so you can scan the barcode of items you're going to eat, and it'll tell you how many calories are in the serving.
3. It has a HUGE database...everything i've ever eaten is already in there!
4. I push myself to eat less and workout more.

Keeping track of your weight is one way to eat less, because you constantly get to see what you're taking in. This program allows you to see how many calories each item is, and tells you how much more you can eat to lose a certain amount of weight. The benefits of keeping a "food diary" are numerous, and the end result is so rewarding!


Thursday, May 3, 2012

Spring Clean Your Body.

I haven't blogged in so long, finals have been killing me. I don't know about you, but when I have major due dates looming ahead, and hours of work and research and studying to do... I tend to focus on that so much, that I don't focus on what i'm putting into my body. Which made me literally feel like crap! I was tired constantly, it was hard to focus, and I felt myself needing to become energized from food, coffee, or red bulls. 


So I've decided, it's time to give my body a little bit of spring cleaning before Summer hits! Here are a couple of recipes to detox all that bad stuff you may have just put into your body like I just did :/


1. Soy Milk Smoothie: 

Ingredients:
-1 pear, peeled
-1 banana, peeled
-1/4c plain greek yogurt
-1/4c plain or vanilla soymilk
-2 tbsp. flax seeds.


Directions:
Blend all together.


Why This Helps:
Pears are full of water-soluble fiber, which helps you feel fuller on less calories, and, along with the flaxseeds, will help your digestion system immensely.


2. Garlic-y Mushrooms, Chicken and Kale


Ingredients:
-2 chicken breasts, chopped
-1 pound of chopped kale, without stems
-8 ounces of mushrooms (portabello are the best for flavor)
-6 garlic cloves minced
-Olive Oil


Directions:
1. Brown the cut chicken pieces in a pan, then set aside.
2. Using the olive oil, saute the minced garlic and mushrooms in a pan for about two minutes, or until aroma spreads (yummm). Add in the Kale and make sure to stir often, as to not let one side of the kale get overcooked.
3. At the last minute, add in the chicken and and keep cooking until kale has softened (it will reduce a lot), then serve.


Why This Helps:
Kale is an EXCELLENT source of antioxidants and fiber. It's an excellent source of beta-carotene which has been known to be a major player in the battle against heart disease and cancer), and also contains caroteniods (that protect your eyes from UV rays and cataracts).


3. Mediterranean Quinoa


Ingredients:
-1c quinoa
-2c vegetable broth
-1tbsp olive oil
-1 small red onion, finely chopped
-3 cups of chopped kale, without stems
-1/2c pine nuts or almonds
-1/2c kalamata olives, without the pits.


For the Dressing:
      -1tbsp lemon juice
      -1 small shallot, minced
      - orange zest
      -1/3c olive oik
      -salt and pepper


Directions:
1. Rinse quinoa and combine with vegetable broth in a medium saucepan over medium-high heat. Bring to a boil, lower the heat, and cover then simmer WITHOUT stirring for about 15 minutes, or until the broth has cooked down. After another 10 minutes, fluff the quinoa with a fork.


2. While the quinoa is cooking, heat the olive oil in a pan and then saute onions for about 5 minutes, then add the kale. Cook for about anothe 10 minutes, or until the kale has softened, and then set aside.


3. Combine all ingredients for dressing in a small bowl, whisking the oil in slowly.\


4. Toss the quinoa with the Kale mixtures, the nuts, olives, and the dressing. I know the picture has feta cheese, but if you're detoxing, don't add this, it's a very fatty cheese with lots of sodium, although it's delicious!


Why This Helps:
Kale is an EXCELLENT source of antioxidants and fiber. It's an excellent source of beta-carotene which has been known to be a major player in the battle against heart disease and cancer), and also contains caroteniods (that protect your eyes from UV rays and cataracts).
Quinoa is an excellent source of protein and fiber, to help your digestion system as well.


"And what is a man without energy? Nothing- nothing at all."-Mark Twain


Sunday, April 15, 2012

Shrimp Avocado Ceviche

One day, C and I stopped into Bonefish, just as their Happy Hour was going on (between 4:00pm and 6:30 pm). Their happy hour is amazing, $5 drinks and appetizers, and you'll walk out full and tipsy on $30.00 or less between two people!

My favorite thing they had was this ceviche appetizer. It had shrimp, avocado, lemon juice, and more. SOOOO delicious. So i decided to recreate it..check it out!


It's pretty simple to make, and can be used as a great appetizer or even dinner with some couscous on the side.

Ingredients:

  • 1 pound of shrimp, deveined without tail
  • 2 lemons
  • 2 limes 
  • 2 tomatoes
  • 1 avocado
  • Chopped fresh cilantro and basil
  • A drizzle of Extra Virgin Olive Oil.

Directions:

1. Chop up the avocado and tomatoes into bite size pieces. Leave shrimp whole, or if using as a dip with chips or as a bruschetta, chop shrimp into small pieces as well. 

2. Roll lemon and lime along counter to make it extra juicy, then chop in half and squeeze the juice over the mixture.

3. Add in the fresh cilantro and basil, and a drizzle of the olive oil. Season with some sea salt and pepper. Serve on it's own, with chips, or bread.

Try this out next time you have friends or family over, it'll be a hit!

Friday, April 13, 2012

Life's Little Instructions.

In the spirit of loving yourself and keeping yourself happy...here's some little life instructions. I found this picture this morning, and find it so cute and inspiring. 


Thursday, April 12, 2012

Give Your Home the Benefits of Yoga.

Yoga is a great way to exercise to keep you toned and lean...but also to keep you focused, calm, and unstressed. Unfortunately, it can all go out the window once you come home to a cluttered unorganized house!


If you're like me, coming home to a messy house can stress you out beyond a doubt. So why not give your home a dose of yoga...in the form of Feng Shui??


This Chinese art of placement has been around Asia for more than 2,000 years, while it's just becoming a trend in the U.S. The ancient practice is based on the principle that everything is made of energy...and that good energy flow can bring balance and vitality to every element of your life!
Here are some signs that you may be in need of a Feng Shui Makeover:

-There's clutter everywhere. 
-Messy or overflowing closets and drawers
-Unused or underused spaces
-Wilted/Dying Plants
-Squeaky Doors, stuck windows, leaky roofs
-Bad Smells
-Bedside table on only one side of bed
-Desk facing the wall (creates vulnerability leaving your back to the door)
-Front doors that aren't used
-Dark entries, or unwelcoming art

So here are some tips to get started!


1. Have a specific place for everything in your home...and make sure to always have everything back in it's place! Things like the mailbox key, daily mail, spare linen..all should have a designated spot to call it's own. 

2. Make sure to have a junk box/drawer, for temporary storage of all the small misplaced items. Don't forget to clean out that area from time to time! 

3. Don't hoard things you don't need! If you haven't used something in the last month...and can't think of a time when you will use it next..get rid of it. Why keep it? 

4. The inside and the outside of a front door has the ability to warm, invite, and re-invite guests in your home. So make the views appealing! Light the exterior walkway, and when you open the door, have fresh flowers or smiling faces of your family clearly visible.

5. The living room is a space to gather, so the living room is a room of opportunities. Avoid placing furniture with the back to the door. Large floor rugs, curtains, and candles are great decorations that really warm a room. Decorate to your liking...but don't go overboard!

6. Bookshelves in a living adds depth and texture to a living room. Don't leave magazines and books on tables though-this just adds more clutter.

7. The bedroom, i find, is the most important room to have organized! Your day begins and end in the bedroom, so adding some feng shui really starts and ends your day in a relaxing and pleased mood. But keep things simple. A bookshelf, side tables, and a bed are really all you need. Add in some eye soothing decorations. And remember...vacant floor and wall space have no place in a bedroom!


Now go add a more calming and stress-free environment to your life!


Saturday, April 7, 2012

Face Scrub to Make You Shine.

When life hands you lemons....make a face scrub!


It's time to shed that winter coat...and I found the best recipe to bring that dull skin back to life!

Ingredients:

5tbsp sea salt
1tbsp olive oil
1 lemon.


Directions:

Step One: Mix the olive oil and sea salt together (Once the salt gets coated by the oil, the lemon won't dissolve it)

Step Two: Rub the lemon along the counter to loosen it up, then cut it in half and squeeze the juice over the salt mixture. Mix and mash!

Step Three: Splash your face with warm water to open up the pores, then rub the scrub on your face for at least a minute. Rinse with warm, then cool water. Once done, your face will be smooth as a baby's butt!

Friday, April 6, 2012

Healthy Easter Desserts!


Easter dinner is coming..and just when you thought the holidays (and all of the calories that came with it) were behind you!!

One of my favorite things about easter was the sweets. Candy, chocolate, and desserts galore! But i'm here to tell you that you can enjoy that Easter Dessert, without feeling guilty about it. Here are 3 recipes to bring to the family table that everyone will enjoy :)


Key Lime Pie Bars.

Ingredients:

-1/2c Honey graham crackers, low fat, finely crushed
-2 Tbsp. Unsalted Butter, melted
-1 tsp. truvia/sugar substitute
-1 small box Sugar free lime jell-o 
-3/4c water
-16 oz. pkgcottage cheese, fat free 
-8 oz. pkgcream cheese, fat free, room temperature
-8 oz. pkgcool whip, fat free, frozen, thawedkey limes, sliced, for garnish, optional


Directions: 

Step One: Combine graham crackers, butter and sugar in a spall bowl, and mix until well blended and it has turned into crumbles. Then, press the graham cracker mixture in the bottom of a small square baking dish. Set aside in fridge.

Step Two: Bowl water in a small pot or microwave safe bowl, and stir in Jell-o, mixing until dissolved.

Step Three: In a mixing bowl, blend cottage cheese and cream cheese until smooth, stopping every now and then to scrape sides of bowl. Then whisk 1/2 of cream cheese and cottage cheese mixture into Jell-o mixture until combined, then add rest of cheese mixture. 

Step Four: Fold in cool whip. Using a spatula, spread key lime mixture over chilled crumb mixture. Cover and refridgerate for 8 or more hours, until filling is firm. Cut into squares, and top with a lime wedge for presentation!


Lemon Souffle Cups

Ingredients: 
  • -8 large lemons
  • -3 large eggs, separated
  • -1/2 cup granulated sugar
  • -2 tablespoons all-purpose flour
  • -Confectioners' sugar, for dusting


Directions:
Step One: Preheat oven to 350 degrees. Line a baking sheet with parchment. Trim tip end from a lemon so fruit sits level. Cut stem end one-third of the way down, making cut parallel with bottom; reserve top. Repeat with remaining lemons.
Step Two: Hold a lemon above a sieve set over a bowl, and scoop out the pulp. Squeeze the juice from the pulp, and reserve. Repeat with all lemons. Place shells on prepared baking sheet
Step Three: Combine egg yolks, 1/4 cup granulated sugar, 1/4 cup reserved lemon juice, and flour in the heat-proof bowl of an electric mixer fitted with the whisk attachment. Beat mixture on medium speed until pale yellow, about 3 minutes. Place bowl over a pan of simmering water; whisk constantly until very thick, about 8 minutes. Remove bowl from heat, and return to mixer. Beat on medium speed until cool, scraping down sides several times, about 10 minutes. Transfer to a medium bowl, and set aside
Step Four: Combine egg whites and remaining 1/4 cup granulated sugar in clean mixer bowl. Place the bowl over the pan of simmering water, and stir until sugar has dissolved and mixture is warm to the touch. Remove bowl from heat, and return to mixer; beat on low speed until frothy. Gradually increase speed until meringue is shiny and holds soft peaks, 2 to 3 minutes, being careful not to overbeat
Step Five: Whisk 1/3 of the meringue into the yolk mixture. Gently fold in the remaining meringue. Carefully fill the prepared lemon shells to just below the rims
Step Six: Transfer baking sheet to oven, and bake until meringue is slightly golden and rises about 1 inch above the shell, about 14 minutes. Remove from oven, and transfer to serving plates. Garnish with the reserved lemon tops, and dust with confectioners' sugar. Serve immediately.


Raspberry Pudding Cake

Ingredients:
-2c. Raspberry Sorbet
-1oz pkg Jell-O Vanilla Fat Free Sugar Free Pudding
-1c. fat-free milk
-8oz tup of whipped cream, thawed
-1c. fresh raspberries

Directions:
Step One: Line a loaf pan with foil. Spread sorbet into loaf pan and freeze for 15 minutes.
Step Two: While sorbet is freezing, whip pudding and milk together until pudding consistency. Fold in cool whip.
Step Three: Spread over sorbet mix in pan. Place pan back into freezer for at least 3 hours, or until pudding on top has firmed.
Step Four: Flip pan upside down onto a plate, and remove pan and foil from "cake". Let your creation thaw for about ten minutes, and then slice and serve with fresh raspberries on top.